
Since
everyone loves a good cheat sheet, and there is not one readily
available for debugging third-party iOS applications using a jailbroken
device, here it is! Whether you are a seasoned security researcher, or a
not so experienced hacker wanting to learn more about reverse
engineering, this blog will outline the necessary steps to enable you to
perform dynamic analysis on iOS applications, that you did not develop,
successfully.
Environment Setup
Several devices and tools are required to start debugging iOS applications.
Mac Computer
A Mac computer streamlines the process of debugging iOS applications. As a part of Xcode, LLDB,
Apple’s debugger, is fully functional and external libraries, and SDKs,
are readily available on a Mac. Without a Mac, you will be limited to a
beta build of LLDB,
and have to go through the hassle of obtaining Apple’s SDK’s for iOS to
perform various actions, such as remotely debugging iOS applications.
Further, it is necessary to obtain the debugserver application — in order to remotely debug applications on iOS devices. This application is readily available on a Mac.
LLDB
LLDB
is an Apple-developed debugger, provided to perform dynamic analysis
efficiently among other tasks. LLDB supports debugging C, Objective-C,
and C++ applications.
To
install LLDB, Enter ‘lldb’ within a terminal on the Mac host. If you do
not have LLDB already installed, you will be prompted to install
additional tools for Xcode. Select ‘Yes’; LLDB will be installed
automatically, along with various other tools.
Jailbroken iOS Device
Jailbreaking
a device provides root access to the filesystem as well as allows its
user to install applications not authorized by Apple and unavailable via
the App Store. Because applications downloaded from the App Store are
protected using FairPlay DRM, it is necessary to jailbreak the device so
that you can install third-party applications to bypass Apple’s
FairPlay DRM.
Sign up to get our latest blogs
SSH Access
If
you have a jailbroken 10.2 device, it is not required to install
OpenSSH; however, it is necessary to configure the Dropbear SSH server
to accept connections over WiFi by modifying the dropbear.plist.
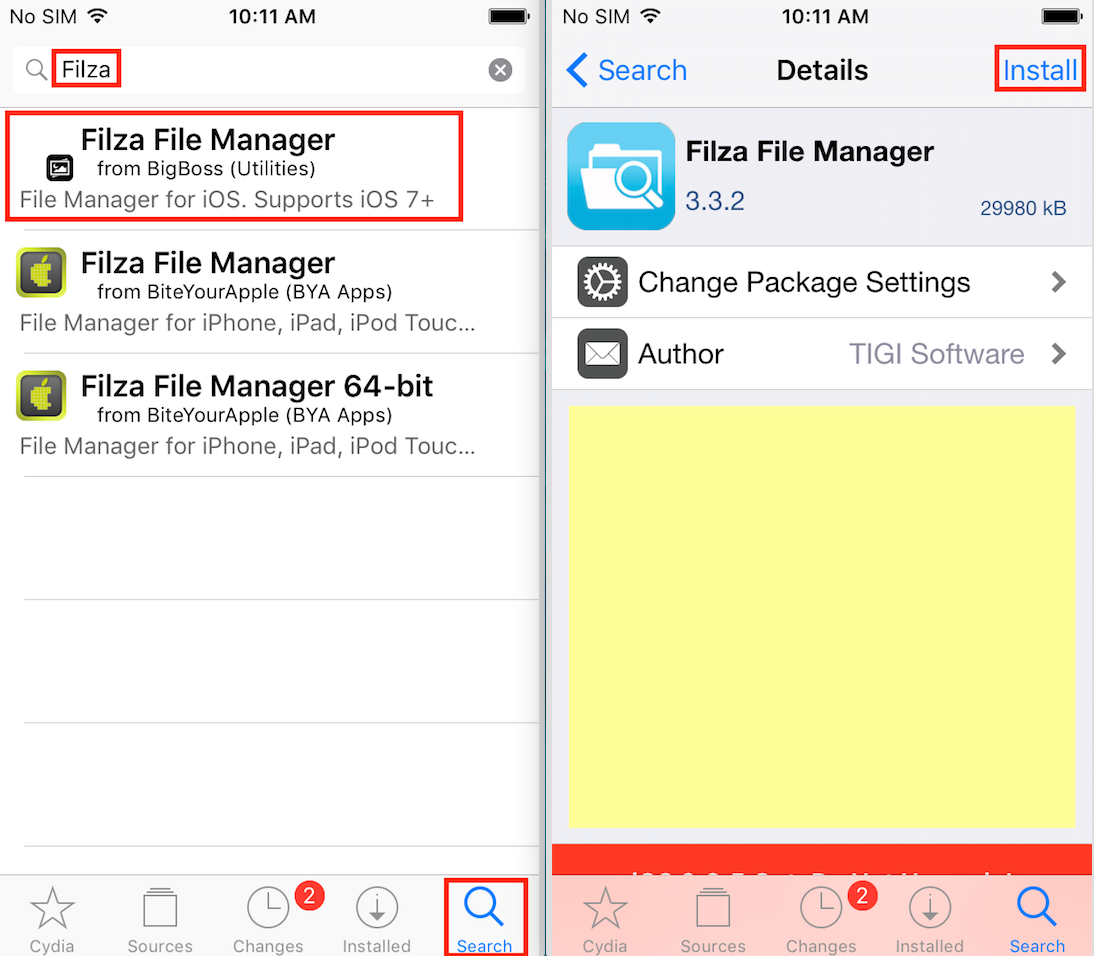
To edit Dropbear’s plist file:
- Install Filza File Manager via Cydia. Open Cydia, search for “Filza,” then select install.
- Use Filza to navigate to: /private/var/containers/Bundle/Application/yalu102/yalu102.app .
- Edit dropbear.plist (Press hold on it > click more> click open with > click Text Editor).
- Replace <string>127.0.0.1:22<string> with <string>22</string>.
- Power off phone and re-jailbreak.
If
you have a jailbroken device running 10.1.1 or lower, you have to
install OpenSSH. OpenSSH for iOS enables a remote computer to establish a
secure shell with an iOS device to browse the filesystem, to execute
command-line programs, and to transfer files to and from the device.
To install OpenSSH:
- Open Cydia on the iOS device.
- Select “Search” to use the search functionality.
- Enter “OpenSSH” into the search bar.
- Select OpenSSH -> Install -> Confirm.
Clutch
When
you download an application from the App Store, Apple uses your public
key, which is generated when you create an AppleID, to encrypt the
application before transferring the application to your device.
Due
to that fact, to perform static analysis on an iOS application, the
binary needs to be decrypted before a disassembler, e.g., IDA Pro or Hopper,
can analyze it. While static analysis is not needed to perform dynamic
analysis, static analysis will make setting breakpoints on methods of
interest simpler. Good for us, Clutch has the capability to decrypt
applications installed via the App Store.
To install Clutch:
- Open Cydia on a device running iOS 8+.
- Select “Sources”.
- Select Edit -> Add.
- Enter cydia.iphonecake.com into the prompt.
- Click Add Source.
- Select “Search”.
- Select Clutch -> Install -> Confirm.

Debugserver
The
console application debugserver is required to debug iOS applications
installed on iOS devices remotely. Debugserver attaches to a process
then listens for connections, from remote devices, for remote debugging.
To install Debugserver:
- Open a terminal on the Mac host.
- Mount an iOS Developer Image.
hdiutil attach /Applications/Xcode.app/Contents/Developer/Platforms/iPhoneOS.platform/DeviceSupport/{iOS version of device}/DeveloperDiskImage.dmg
3. Extract debugserver from the image to the current directory.
cp /Volumes/DeveloperDiskImage/usr/bin/debugserver ./
4. Sign debugserver.
codesign -s - --entitlements entitlements.plist -f debugserver
Entitlements.plist is a property list file that should contain the following:
<?xml version="1.0" encoding="UTF-8"?>
<!DOCTYPE plist PUBLIC "-//Apple//DTD PLIST 1.0//EN" "http://www.apple.com/DTDs/ PropertyList-1.0.dtd">
<plist version="1.0">
<dict>
    <key>com.apple.springboard.debugapplications</key> <true/>
    <key>run-unsigned-code</key> <true/>
    <key>get-task-allow</key> <true/>
    <key>task_for_pid-allow</key> <true/>
</dict>
</plist>
5. Transfer the signed binary to the /usr/bin/ directory within the iOS device’s filesystem via scp or a different file transfer application, e.g., FileZilla, from the Mac host.
The
default password for the root account is ‘alpine’. It is recommended to
change this password after jailbreaking a device. Steps to change the
password can be found here.
scp debugserver root@{IP address of iOS device}:/usr/bin
You may have to change debugserver’s permissions to allow the binary to be executed. While ssh’d into the device, use chmod to change the binary’s permissions to make it executable. More information about *nix file permissions can be found here.
ssh root@{IP address of iOS device}
cd /usr/bin/
chomd +x debugserver
The Fun Part
Now that setup is out of the way, and you have a target in mind, in this case, Damn Vulnerable iOS App (DVIA) — let’s start debugging!
- Using your Mac, open a terminal and ssh into the jailbroken device using the root account’s username and password.
ssh root@{IP address of iOS device}
2. Run Clutch to decrypt the application so a disassembler can decompile it.
clutch -i // To display applications installed using the App Store
clutch -b {target's application numerical representation for Clutch}

Since
DVIA is not installed via the App Store, it will not be recognized by
Clutch. In the example above, Clutch is used to decrypt the TestFlight
application.
3.
After Clutch decrypts the binary, extract the binary using SCP, or
another file transfer application such as FileZilla, then load the
binary into a disassembler, e.g., IDA Pro or Hopper, to identify methods
of interest. The Mac’s firewall may need reconfiguration to allow
incoming SSH connections to permit this transfer.
scp {target's binary} {Mac user account}@{IP address of Mac}:/Users/{Mac user account}/Desktop

4. While ssh’d into the device, determine the process id (PID) of the target application using the PS
application within the terminal. This application will display
information about active processes on the device. To make discovering
the PID easier, grep could be used to filter the processes PS displays.
Make sure the application is running :).
ps aux | grep -i {target application's name}

5.
After determining the PID of your target, attach debugserver to the
application and instruct it to listen on a port of your choice.
debugserver {IP address of Mac}:{port} -a {PID}

6.
After debugserver attaches to the process, connect the Mac to the
remote debug server. Within a new terminal on the Mac host enter the
following:
lldb
platform select remote-ios
process connect connect://{IP address of iOS device}:{port}
// Where {port} is the port number entered in step 5.

If
you see output similar to the output above, LLDB has successfully
attached to the debug server and is ready to start debugging. From here
you can set breakpoints on the methods identified in step 3, display
data stored in registers, and read sections of memory. As you become
more familiar with LLDB, you can execute more advanced actions such as,
e.g., examining threads and evaluating expressions. A quick reference
guide for LLDB commands can be found here.
Caveat
Some
developers implement jailbreak detection within iOS applications. This
mechanism checks for common artifacts of jailbroken devices. These
artifacts include the presence of Cydia, Cydia Substrate, sshd, or apt.
Depending on the implement, once a jailbroken device is detected, the
application will force close its self on load, or notify the user that
the application cannot run on a jailbroken device then run in a disabled
state, preventing dynamic analysis. Luckily for us, there is a tool to
circumvent such detections, tsProtector 8+ — which
is available via Cydia. It should be noted that tsProctector 8+ will
not work in all cases; however, tsProtector 8+ is capable of bypassing
jailbreak detection implemented within most applications.
